Category: The Nine Days

Miso Glazed Tilapia

I hate my scale. It tells me how to feel about my body regardless of how I look in the mirror. I hate my scale. But like a magnetic force of nature, it draws me to it each morning and it dictates my day. I hate my scale. Today I weigh more, so I will feel bad about myself and I will hate how I look. Today I’ve lost a lb. so I will feel good about myself and like how I look. I hate my scale.

I want to break free of my morning ritual and throw the damned machine out the window! A number should not dictate how I feel about myself.

Rant over. (feel free to chime in).

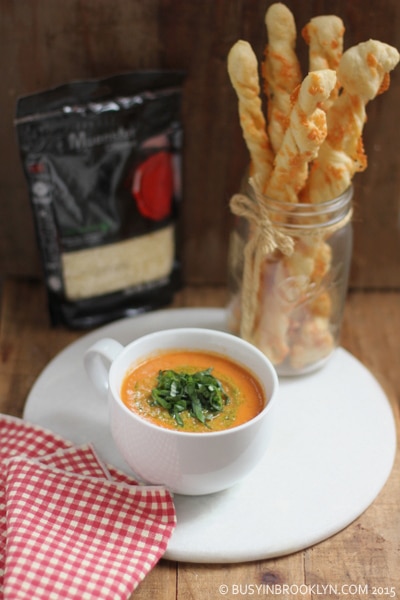
Speaking of weighing myself, I”ve dropped a couple of digits on that godforsaken machine due to the South Beach Diet. After a Pesach filled with nonstop meals, I hopped straight onto the diet as soon as I got back from Aspen, and I’ve been sailing through due to delicious dishes such as this. Honestly, I’m not a big fan of tilapia (bottom-feeder fish that are farm-raised) so I rarely buy it, but I know that many people eat it regularly. If you don’t like tilapia, flounder makes a great substitute, so just use that instead.
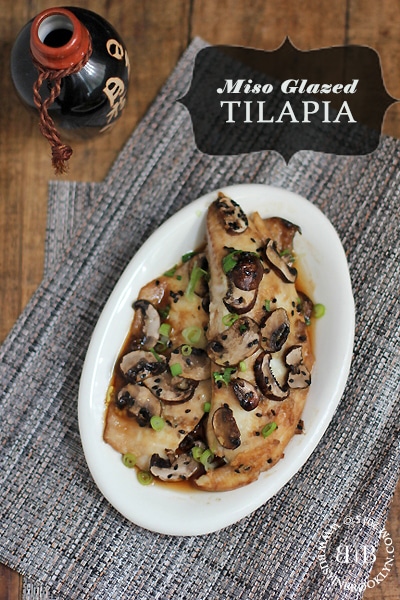
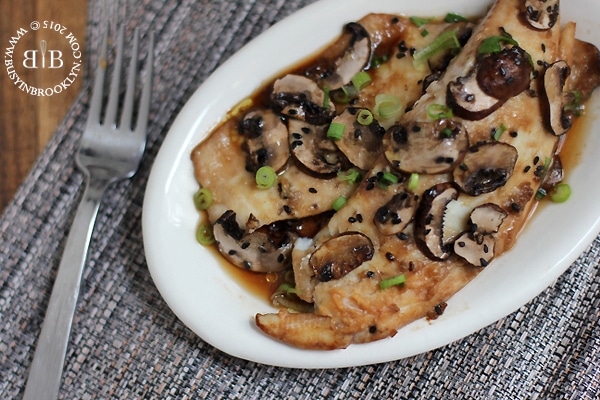
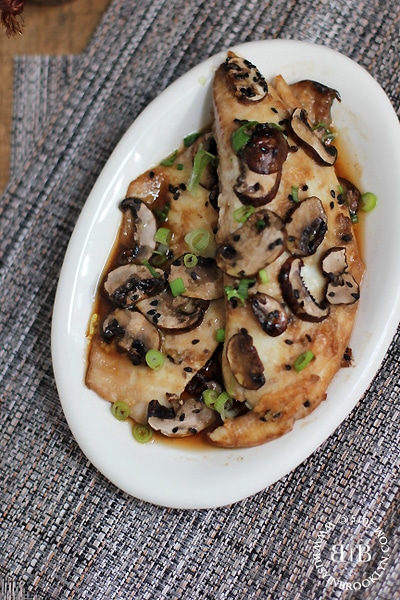
Related Recipes: miso glazed eggplant

Post a Comment

Passover Nachos with Homemade Plantain Chips

Ever since I jumped on the Paleo train, plantains have become a regular part of my diet. I frequently buy Trader Joes roasted plantain chips to eat with guacamole or even tuna salad. I eat them on taco night while my kids enjoy crunchy corn tacos, and I top ’em with nut butter for a delicious treat.


It took me a while to start making my own plantain chips, but once I did, I never turned back. Once you get past the peeling part (which is really ridiculously easy), there’s not much to it.

I prefer to use a mandoline for slicing my plantains because it ensures that all my chips are equal in size so that they cook evenly. Sadly, I don’t have a dairy one (yet!), so I just used a sharp knife. If you’re careful about keeping your chips even, they’ll all bake up nice and crisp at the time same time, and if they don’t, you can just remove the ones that are ready and let the thicker ones finish in the oven.

It’s really that easy! You can bake them savory or sweet – but chili powder and kosher salt are my fave. Of course some gooey melted cheddar doesn’t hurt either.

Can you believe these crunchy cheese smothered chips are kosher for Passover?! Forget the greasy potato chips, and the boring old Passover brownies, THIS is a snack that will make you forget you’ve gone gluten free for 8 days. Yes, it’s as good as it looks, and you know you want it. Now.

Forget Passover, these nachos are great for year-round guilt-free nacho-eating. When you’re eating low-fat oven-baked chips that are made out of a fruit and topped with vegetables, can you even call them nachos? You’re basically just doing your best to get your fill of fruits and veggies, right? RIGHT?

Welcome to my world of deguiltifying comfort food. It’s what I do best.

Now that I’ve got you covered with homemade nutella, nutella banana ice cream, pure-bliss Passover nachos and endless other out-of-the-box kosher for Passover recipes, you can say goodbye to the chicken and potatoes you’ve been making for ages and try some fun dishes instead. Although, if you like the “same old” , I’ve got you covered with that too.

Related Recipes: cauliflower nachos with harissa cheddar sauce

Post a Comment

Cheesy Zoodle Marinara + Zoodles 101

With Passover soon approaching, I think it’s time for ZOODLE school! Zucchini noodles, or zoodles, have taken the (healthy) food world by storm, and I am all over the trend.

I’m been zoodling for months now, and I’ve come to love zoodles even more than traditional pasta. Besides being fun and easy to make, zucchini noodles are cheap, very low in calories, and you can get lots of noodles out of a single zucchini. If you haven’t hopped on the zoodle train, it’s time for zoodle 101.

There are three popular tools on the market for making zoodles: The Veggetti, The Julienne Peeler and the Paderno Spiralizer. Each tool has it’s pros and cons. Lets get into it!

THE VEGGETTI – The veggetti works like a pencil sharpener – each side has a different size blade, one larger and one smaller to yield a thicker or thinner noodle. If you look at the picture below, you can see the leftover zucchini looks like the tip of a sharpened pencil. The veggetti makes long noodles, but perfect ones come with practice. Turning the zucchini is a bit difficult and the results can be a bit scraggly.
PROS: compact, inexpensive ($12-$15)
CONS: You can only make noodles out of veggies that fit in the veggetti opening – up to 2.5″ in diameter.
Purchase here

THE JULIENNE PEELER: A julienne peeler looks like a traditional vegetable peeler, except the blade has little micro blades that cut whatever you are peeling into julienned strips. I prefer the OXO brand.
PROS: compact, inexpensive ($10), easy to use, easy to clean.
CONS: yields the most waste, you get strips and not traditional-looking noodles, only works on straight vegetables that are easy to peel.
Purchase here

THE SPIRALIZER: The spiralizer is the most versatile tool. It allows you to create noodles out of many different vegetables, and even fruits. Any fruit or vegetable that is at least 2.5″ long and at least 1.5″ in diameter can be spiralized. It cannot be hollow or have a pit, and it must be firm. You can spiralize apples, pears, beets, jicama, plantains, kohlrabi, potatoes, sweet potatoes, butternut squash (the neck), turnips and more! The spiralizer also yields the most authentic looking noodle. I prefer the Paderno brand.
PROS: yields the most authentic noodle, various blades yield different noodle shapes, works with a variety of fruits and vegetables, easy to use.
CONS: takes up the most space, not cheap ($30-$40 for the 3-blade and $50 for the new 4-blade), endlessly long noodles tangle and are hard to eat (I recommend cutting them shorter with kitchen shears), hardest to clean (I recommend cleaning immediately otherwise it’s hard to remove dried residue).
Purchase 3-blade, Purchase 4-blade

Here you can see how the noodles look based on the tool that was used, and what you have leftover after making the zucchini noodles. Now, lets talk about cooking methods.

BLANCHING – blanching means to cook vegetables quickly in boiling water and then shock them in an ice bath. As you can see below, this yields a mushy noodle. Not recommended!
ROASTING – roasting the zucchini noodles at 400 degrees for about 5 minutes, yields tender zoodles that are evenly cooked.
SAUTEEING – this is my favorite cooking method as it is fast and easy. I saute my zoodles in a wok or large skillet over high heat for about 2-3 minutes for perfectly tender zoodles.

An important point to consider about zoodles, and which tool you want to use to make them, is that zucchini’s have a lot of water. When you use the veggetti or the spiralizer, the seedy center of the zucchini (where most of the water is), get’s incorporated into the noodles. When you use a julienne peeler, you can stop peeling once you reach the seedy portion (in fact you’ll need to, because the strips will just fall apart). Therefore, zoodles made with the julienne peeler have less moisture and won’t water-down your sauces (same goes for cucumbers btw). If you prefer to use a spiralizer or veggetti, one way to solve this problem is to salt the zoodles to draw out some of the moisture. Let the salted zoodles drain in a colander for a few minutes, rinse off the salt and then pat dry on paper towels. I prefer to skip this step. Instead, I only cook my zoodles until tender, and I serve them immeidately (the longer they sit, the more moisture they will emit).

Now that we’ve covered the zoodles – what can you make with them? Well, you are only limited by your creativity! One of my favorite zoodle dishes is this cheesy zoodle marinara. I whip it up for lunch at least once a week! It’s so hearty and indulgent, yet it takes under 5 minutes to prepare. I use the julienne peeler for this because it’s the quickest, and I don’t want my lunch to be a whole to-do. Also, because I don’t use the seedy center of the zucchini, the zoodles don’t water down my sauce.

What else do I make with zoodles? Zoodle Pad Thai (recipe in my ebook), Zoodle Bolognese, Pesto Zoodles with Parmesan, Minestrone Soup with Zoodles, Chicken Zoodle Soup, Miso Soup with Zoodles and more!

And my spiralizer? Well the skies the limit on that! I make everything from rice and risotto to pizza crusts and sandwich buns – all out of vegetables!

If you’re looking for more recipes using the spiralizer, I’ve got loads of delicious spiralized dishes in this months issue of Joy of Kosher Magazine, so be sure to pick up a copy! You’ll find great Kosher for Passover recipes like beet-crust pizza with arugula walnut pesto and fresh mozzarella, cucumber salad with almond butter dressing, Spanish sweet potato rice with lime marinated chicken and no-bean minestrone with zoodles.

You can also check out the new Inspiralized cookbook by Ali Maffucci of Inspiralized.com.


This post was sponsored by Natural & Kosher Cheese. Follow them on FacebookTwitter, Pinterest, Instagram, YouTube, Google+, or via their Blog

Other Zoodle Recipes:

spinach white bean minestrone with zoodles
harissa roasted chicken with zoodles

Post a Comment

Roasted Tomato Soup with Muenster Breadsticks

I really feel bad for you guys. Here I am living it up in sunny Miami, while my fellow Brooklynites are stuck with a curfew while the city shuts down due to a blizzard. I’m truly thinking of you while I sit here relaxing at the beach! :- p

And just to show you how much I care, I’m sharing this comforting roasted tomato soup with muenster breadsticks in honor of Snowmaggedan 2015! I know you all stocked your houses to the hilts, so chances are, you have the ingredients on hand (and then some), so lets get cookin’!

They’re calling this NorthEastern historic and crippling and I’m calling this recipe duo soul-warming and pure comfort food. It’s the perfect kind of meal to eat at the fireplace while piles of fluffy white snow accumulate outside your window. Winter Storm Juno’s got nothing on you.

We start our not-so-little snow feast with roasted tomato soup. If you’ve never roasted tomatoes before, it’s time to start! They become so deliciously sweet – perfect with sweet roasted garlic and shallots. Topping off the soup with pesto and fresh basil just takes it over the top.

You can’t have tomato soup without cheese and bread! I love me some grilled cheese with tomato soup, but roasted tomato soup requires something a bit more sophisticated – like breadsticks! Don’t be overwhelmed by the thought, I keep things simple using a quick & easy pizza dough (you can even use store-bought dough). And for the filling – I use my ultimate favorite cheese of all time – MUENSTER! Muenster is a white cows-milk cheese that melts incredibly well. Natural & Kosher makes convenient pouches of shredded muenster that are perfect for making grilled cheese, mac ‘n cheese, pizza, or quesadillas.  I like to twist my breadsticks so I get lots of the toasted crispy cheese all around, but you can also make these more traditional and keep the cheese inside (see recipe for how).

Now back to sunny Miami – we’re keeping away from the pool today because it’s all of 55 degrees,, and the natives are pulling out their Uggs! I’m still on a high from The Miami Marathon (hashtag Miami Famous) this past Sunday, which I was lucky enough to walk/run in honor of The Friendship Circle.


Running a marathon was something I’ve always wanted to do, but I never thought I’d really do it. When my friend Rochel Leah recruited me for Team Friendship, I wasn’t quite sure what I was getting myself into. Little did I know, I’d have to train 4 times a week to complete 13 miles, when I could barely meet a single mile mark.

Six weeks of training proved nearly impossible in 20 degree weather (and less!), but I pushed myself to my limit and walked/ran as much as I could. Four times a week didn’t happen, but I managed quite a few training sessions, increasing my mileage to as much as 10 miles. I covered Prospect Park, Brooklyn Heights, Dumbo, Williamsburgh, Long Island City and more! I can’t wait to share pics and more about my experience in a future post. In the meantime, you can still support my run and help me reach my fundraising goal here!

I’m off to relax in the sun, but stay warm you guys, I’m thinking of you!


This post was sponsored by Natural & Kosher Cheese. Follow them on FacebookTwitter, Pinterest, Instagram, YouTube, Google+, or via their Blog

Related Recipes:

minestrone soup
3-cheese broccoli pull apart buns
lasagna roll-ups

Post a Comment

Wilted Kale & Kabocha Squash Salad

Kabocha squash seems to have gained popularity in recent years. When I was growing up, no-one ever seemed to know what it was. Maybe that’s because my mom always called it kaboochie squash! She’s not usually ahead of the trend, but she’s been making it ever since I can remember.

Kabocha is a winter squash that’s grown primarily in Japan. It’s often referred to as Japanese pumpkin. It’s not the prettiest looking thing, and it’s one of the hardest squashes to cut, but it’s definitely worth the effort. Kabocha squash is sweeter than traditional pumpkin, with a creamy texture similar to sweet potato. My mom always roasted it with brown sugar, my favorite, but it’s also wonderful braised with savory Asian flavors like soy sauce and ginger.  To make kabocha squash easier to tackle, I like to look for small ones that I can break open with one swing of my chef’s knife. The best part about it is that it’s got an edible peel, so there’s no need to start fussing with the knobby skin.

For this winter kale salad, I decided to roast the kabocha squash with maple syrup and pair it with seasonal pears and pecans. I’m not a fan of raw kale, so I wilt it down a bit to make it easier to eat. If you don’t find raw kale to be tough, you can go ahead and skip this step.

Related Recipes:

kale persimmon salad

Post a Comment